It is not hard to see that people are more and more preferable to storing their files including documents, pictures, videos, etc. on cloud storage to save local storage space and prevent files from loss due to hardware failure, natural disasters, or other unexpected things.
It is not hard to see that people are more and more preferable to store their files including documents, pictures, videos, etc. on cloud storage to save local storage space and prevent files from loss due to hardware failure, natural disasters, or other unexpected things.
As the demand for cloud storage grows, many cloud storage providers have emerged in the market and offered advanced or unique features to free and paid users. As the advancements attract users to switch from one cloud storage to another or use multiple cloud storage at once, they need to the backup entire or just a part of files between cloud storage.
And besides cloud storage switching, another important reason for backing up files on cloud storage is to prevent files from accidental loss. Though cloud storage is considered as a safer alternative to legacy storage systems, the files stored on the cloud are still at risk of losing. For example, some users find their files on Dropbox were missing for unknown reasons. Therefore, it is necessary to backup your important files on cloud storage to another to keep a backup in hand.
Last but not least, most cloud drive provides users with free but limited storage. Backing up files from one cloud storage to another and then delete files on the original cloud is also a way to free up some space if you don’t want to upgrade your current account.
How to Do Cloud to Cloud Backup Directly?
No matter what your reason for backing up files between two cloud storage, you may need an easy way to achieve it. As we all know, downloading files from cloud storage to the local computers and re-uploading them to another cloud storage is a feasible way to backup files. However, this method is really time-consuming. To improve your backup efficiency, you can turn to a professional cloud backup service like cBackupper, which has merits as below:
- Backup files directly without downloading and uploading:
cBackupper allows you to add cloud storage accounts owning to one or various brands of cloud storage like Google Drive, OneDrive, Dropbox, FTP/SFTP, and so on in its interface. Then, you can backup files between any two of the cloud storage you have added with cBackupper.
- Offer flexible backup settings:
cBackupper offers many useful backup features. For instance, you can set up a scheduled backup in a specific time/daily/weekly/monthly mode to automatically backup your data at a regular interval or special timing. Besides that, you can choose to filter some types of files during the backup process. Moreover, you can also enable Email Notification to notice the backup results.
- Ensure the security of your data:
cBackupper is based on an authorization system called OAuth, which can ensure the security of your data. Meanwhile, it will not save or cache the data or files on the server so that you can feel free to use this tool and totally trust it.
Step-by-step Guide to Do Cloud to Cloud Backup with cBackupper
Let’s take Google Drive and OneDrive as an example to show you how to backup files from Google Drive to OneDrive with cBackupper:
- cBackupper is a web-based service so you don’t need to download or install any app. Just go to the main page of cBackupper, click “Sign up” at the upper right side, then type your email, password, and name to create an account and sign in.

2. Click “Add Clouds” under “Clouds” tab, select your clouds (here is Google Drive and OneDrive), and click “Add”. Then, sign in your account of Google Drive and OneDrive to authorize cBackupper.

3. Now, the added cloud drives are listed on the left side of the page. You can click the three-dot icon next to each cloud drives and select “Allocate Space” to adjust the storage space you want to use for backup flexibly with three options as shown in the picture below.

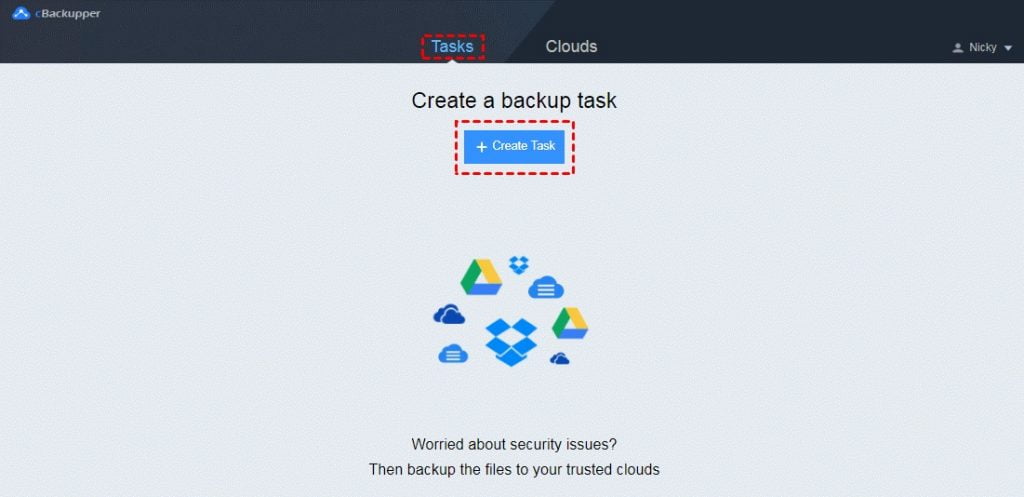
4. Click on “Tasks” tab at the top of the page, then, click “Create Task” button to create a backup task.

5. Name your backup task in order to distinguish. Click “Add Source” button to add Google Drive or certain files on Google Drive as backup destination. Click “Add Destination” to add OneDrive.

Note:
- When you choose the backup destination, remember to tick “Secondary Destination” option to choose another cloud storage as secondary backup destination. Once the space of your first backup destination is insufficient, files will be automatically backed up to the second one.
- Under “Settings” button, you can enjoy “File Filter” feature and enable “Email Notification”. You can also set automatic backup under “Schedule” button.
- Click “Start Backup” in the lower right corner to backup files from Google Drive to OneDrive.
Conclusion
As we can see, backing up files from one cloud storage to another can be an easy work under the help of cBackupper. With useful features of cBackupper like Scheduled Backup and File Filter, you can save much time and improve your backup efficiency. And besides cloud backup, you can also use cBackupper to do the best personal cloud backup and combine multiple cloud storage accounts on one platform to take full use of all the free cloud storage. What’s more, it is free now, give it a try!


