Are you looking to create your own WordPress plugin? WordPress plugins are a great way to add functionality to your website and enhance the user experience. In this guide, we’ll walk you through the step-by-step process of creating a WordPress plugin.
1. Planning and Preparation
Before you start coding your plugin, it’s important to do some planning and preparation. This will save you time and ensure that your plugin is built to meet your needs.
Example:
Let’s say you want to create a plugin that adds a custom widget to your WordPress site. You’ll need to decide what the widget will do, what it will look like, and how it will function. This will involve researching the WordPress widget API and determining the code required to build the widget.
2. Setting Up Your Development Environment
Once you have a plan for your plugin, it’s time to set up your development environment. This will include installing a code editor and a local development environment like MAMP or XAMPP.
Example:
Let’s say you’re using a Mac and want to set up your development environment with MAMP. You’ll need to download and install MAMP, create a new project folder, and set up a local WordPress installation within MAMP.
3. Creating the Plugin File and Folder Structure
The next step is to create the file and folder structure for your plugin. This will include creating a new folder in the WordPress plugins directory and creating a new PHP file for your plugin.
Example:
Let’s say you want to name your plugin “Custom Widget”. You’ll need to create a new folder called “custom-widget” in the WordPress plugins directory and create a new PHP file called “custom-widget.php” within that folder.
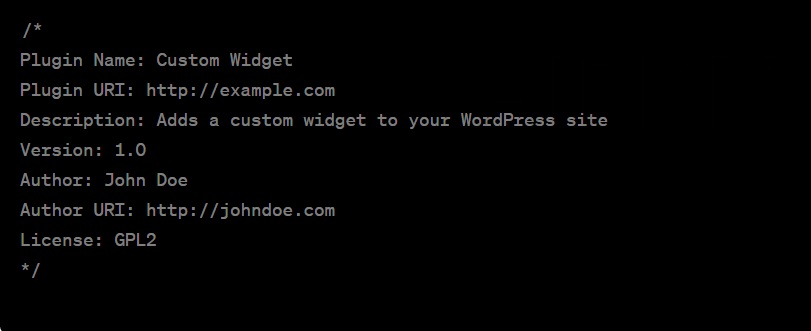
4. Adding Plugin Information
In order for your plugin to work properly, you’ll need to add some information about your plugin. This will include a plugin header with the name, version, author, and other details.
Example:
Let’s say you’re the author of the plugin and want to include your name and email address in the plugin header. You’ll need to add the following code to the top of your PHP file:
5. Adding Plugin Functionality
Now it’s time to add the functionality to your plugin. This will involve writing the code that adds the custom widget to your WordPress site.
Example:
Let’s say you want your custom widget to display the latest blog posts from your website. You’ll need to use the WordPress widget API to create the widget and write the code to query the latest blog posts and display them in the widget.
6. Testing and Debugging
Before you release your plugin to the public, it’s important to test and debug it thoroughly. This will ensure that your plugin works properly and doesn’t cause any issues on your website.
Example:
Let’s say you’ve added the custom widget to your WordPress site and want to test it. You’ll need to navigate to the widget section of the WordPress dashboard and add the custom widget to your site. Then you can check that the widget displays the latest blog posts as expected.
7. Releasing Your Plugin
Once you’ve tested your plugin and made any necessary changes, it’s time to release your plugin to the public. There are a few different ways you can do this:
- Upload it to the WordPress Plugin Repository: This is the official repository where users can search for and download WordPress plugins. To upload your plugin, you’ll need to create an account on the WordPress.org website and submit your plugin for review. If your plugin meets the guidelines and requirements set by WordPress, it will be approved and listed in the repository. This is a great way to get your plugin in front of a large audience and potentially gain a lot of downloads and users.
- Sell it on a marketplace: There are also a number of marketplaces where you can sell your WordPress plugins, such as CodeCanyon or Envato. These marketplaces allow you to reach a different audience and potentially earn money from your plugin. However, keep in mind that these marketplaces may take a cut of your earnings.
- Sell it on your own website: If you have your own website or blog, you can sell your plugin directly to your audience. This gives you more control over pricing and distribution but may require more effort in terms of marketing and promotion.
Regardless of which method you choose, it’s important to promote your plugin and make it easy for users to find and download. This can include creating a dedicated page on your website or blog, reaching out to influencers in your niche, and engaging with users on social media.
8. Create the Frontend Interface
Once you have created the backend functionality of your plugin, you need to create a frontend interface for users to interact with your plugin. This can be done by creating shortcodes, widgets, or Gutenberg blocks.
Example:
For instance, if you have created a plugin to display the latest posts from a specific category, you can create a shortcode that users can insert into their posts or pages to display the latest posts.
9. Test Your Plugin
Before releasing your plugin, it’s essential to test it thoroughly to ensure it’s working correctly. You can test your plugin by using different WordPress versions and testing it with other plugins to ensure compatibility.
Example:
For instance, you can test your plugin on different WordPress versions, such as the latest stable version and the previous stable version, to ensure it works with all versions. Additionally, you can test your plugin with other popular plugins to ensure there are no compatibility issues.
10. Publish Your Plugin
Once you have tested your plugin and ensured it’s working correctly, it’s time to publish it to the WordPress repository or your website. You can submit your plugin to the WordPress repository by following their guidelines and uploading your plugin files. Alternatively, you can host your plugin on your website and provide a download link for users.
Example:
For instance, you can publish your plugin to the WordPress repository by following their submission guidelines and uploading your plugin files. Alternatively, you can host your plugin on your website and provide a download link for users to download and install your plugin.
Conclusion
Creating a WordPress plugin may seem like a daunting task, but it’s a rewarding experience that can help you improve your development skills and provide value to WordPress users worldwide. By following the above steps, you can create a functional WordPress plugin that can solve a specific problem or provide a unique feature to users. Remember to test your plugin thoroughly before publishing it and always follow WordPress coding standards to ensure compatibility and security.