Have you faced SSL Connection Error on your Android Phone?
The error looks like:
But why do you see this error?
There are several possible reasons:
- You have set the date and time on your phone incorrectly.
- Your antivirus program is blocking access to a website.
- Installation of the Security Socket Layer (S.S.L.) and TLS (Transport Layer Security) on the server is done in the wrong way.
- You have not cleared the cookies and cache for an extended period.
- You are using public Wi-Fi.
- The SSL certificate is not from a trusted C.A.
These are some of the possible reasons why you see SSL Connection Error on your Android Phone.
If you are a web owner, make sure that you buy an SSL certificate from a trusted authority. to avoid such SSL errors.
To fix SSL Connection Error on your Android smartphone, try out these troubleshooting tips:
Reset the date and time on your device
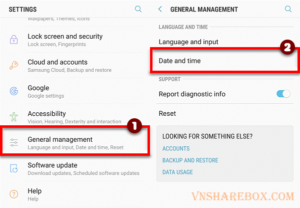
Go to Settings on your Android phone.
Select General management and then, Date and Time.

Image source (vnsharebox)
Next, switch off the Automatic date and time. You will find other options to set the time.

Image source (vnsharebox)
The ‘Set date’ option will allow you to customize the date/month/year.
And the ‘Set time’ option lets you customize the hour/minute.
What is more, the ‘Select time zone’ option will allow you to switch to another time zone.
You can reset Date and Time according to the Internet by switching Automatic date and time.
Clear browsing history and cache
Some expired cookies might be causing the SSL Connection Error on your Android smartphone.
To clear browsing history and cache on Chrome browser for example,
Open Chrome and click on the menu icon (three black dots) in the top-right corner.

Image source (vnsharebox)

Hover the mouse on More tools option.

Image source (vnsharebox)
In the sub-menu, click on Clear browsing data.
You can check or uncheck the items on the list of what to clear on the left side of the window.
If you choose the basic option (recommended), you can check:
- Browsing history
- Cookies and other site data
- Cached images and files
If you choose the Advanced option, you will see additional options you can clear. Prefer this option only if clearing the cookies and data from the Basic option do not work.
By choosing Advanced, you will be clearing:
Also, note the Time range option on both the Basic and the Advanced options. You might want to choose ‘All Time’ to clear all the data instead of only removing it from the ‘last 24 hours’.
Once you select all options, Click on Clear data.
Reset the app preferences
Sometimes resetting the app preferences on your Android phone might resolve the SSL Connection Error.
To reset preferences for a single app,
Go to the App Drawer and search for Settings.
Select the ‘Apps’ option:
And pick the app to reset.
Now, from within the App info page, navigate to Open by default.
Click on CLEAR DEFAULTS.
You can also reset all app preferences by following the steps, as shown in the snapshot below:
Disable Antivirus
Chances are, your antivirus is interfering with your browser and causing the SSL connection to fail.
To disable antivirus on Android, you will have first to deactivate the Device Administrators’ permission.
Follow these steps to do so:
- Open your device Settings.
- You will find Device admin.
- Pick the appropriate Device Administrators option.
- Usually, Device Administrators’ permission is located under Security settings.
The steps may vary slightly depending on the device model you have and the Android version, and seller customizations.
Next, pick antivirus from the list of apps.
Click Deactivate.
You will not deactivate it on some Sony smartphones as the company installs the A.V.G. Protection Xperia app at the system level.
Update your App
If you have not updated your app in a long time, it might be causing the error.
To automatically update apps on your Android device, follow these steps:
- Open the Google Play Store.
- In the upper-left corner of your screen, click on the three horizontal lines.
- Next, tap on the Settings and on Auto-update apps option.
- You will be asked about your update preference via a pop-up window.
- Pick your preference and tap on it.
- Then, tap the ‘Done’ option.
Switch to a private Wi-Fi network
Public Wi-Fi networks are not secure. Scammers can easily set up an open access point and entice unsuspecting users to carry out attacks.
So, your browser might be blocking your device from accessing the website from an unsecured network.
If you are accessing public Wi-Fi, try switching your network to a private Wi-Fi connection and see if it fixes the SSL Connection Error in your Android phone.
Try resetting your Android device
If all else fails, try resetting your Android device. But before you take this step, backup your phone, else you end up losing all the data you have stored.
To reset your stock Android device, follow these steps:
- Go to Settings on your phone.
- Scroll down to System and click on it.
- You will find the Reset option.
- Click on Erase all data (factory reset).
- You will find a list of data to be erased.
- Tap on it and click Delete all data.
Wrapping Up
Using an SSL certificate is one of the best ways to secure a website. But it can cause different errors like the one you have encountered while browsing from your Android phone.
The SSL Connection Error is a common error faced by many Android users. However, you can resolve the issue by following the steps provided in the article.
Make sure to try the troubleshooting tips one by one until you find a solution.
If you are the website owner, you must buy an SSL certificate from a trusted source. If you get your digital certificate from a C.A. that cannot be trusted, you will be facing lots of issues. Many modern browsers will not recognize SSL cert from an untrusted C.A.


